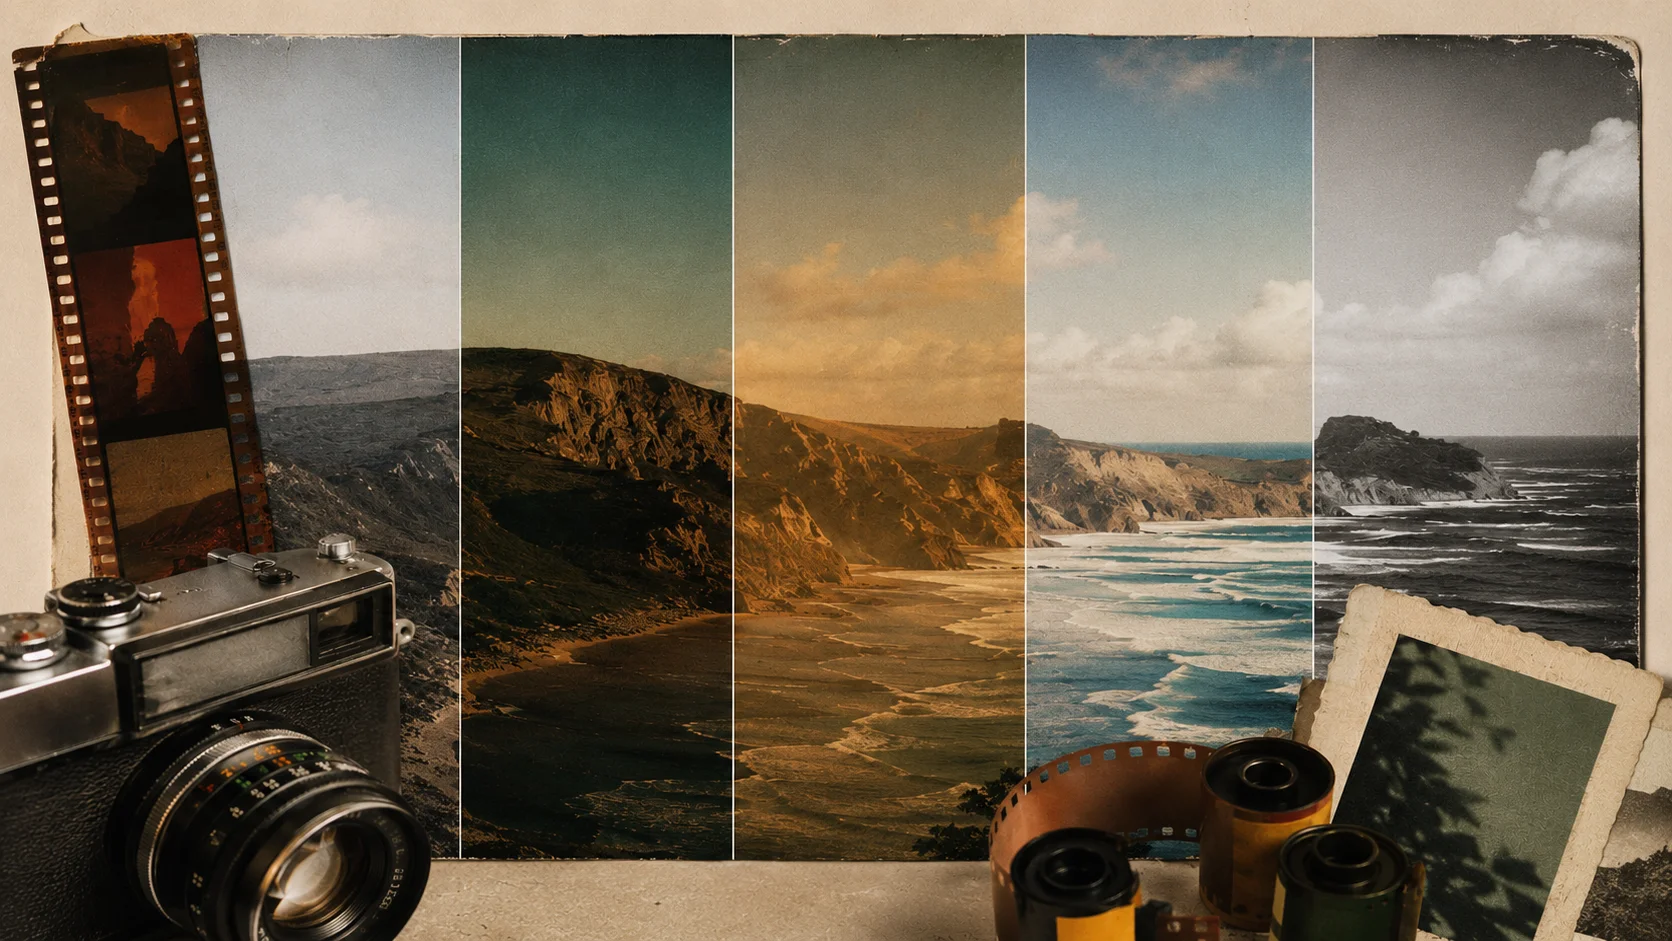
Two photographers. Same camera. Same scene. Same light.
One loads Kodak Portra 400. The other loads Fuji Velvia 50.
The images they come back with look like they were shot in different countries on different days. Not because of technique — because the film stocks have completely different opinions about color, and those opinions are baked into the chemistry at the emulsion level.
This is the thing that surprises people who grew up shooting digital: the camera doesn’t have opinions. The film does.
The Characteristic Curve (and Why It’s Not One Curve)
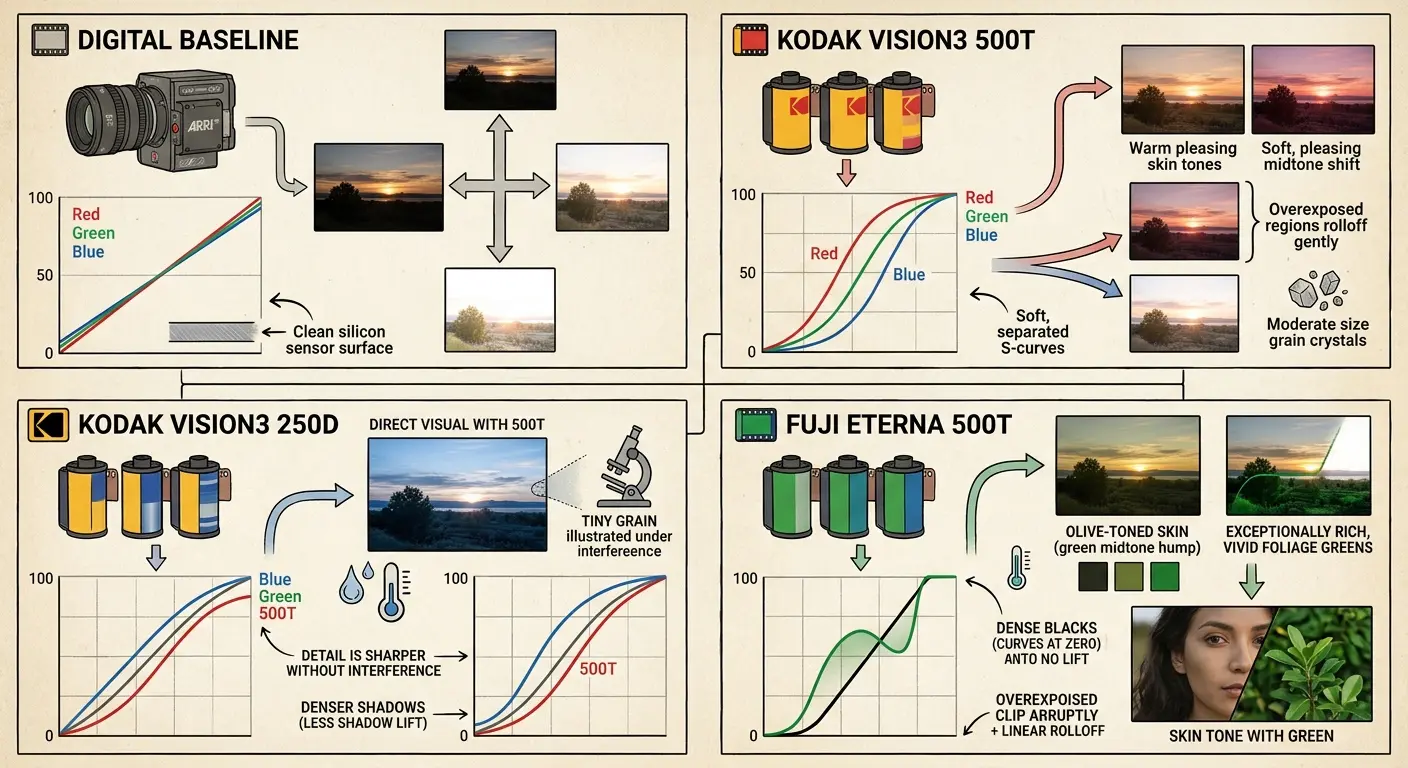
Every film stock has a characteristic curve — a graph mapping input exposure to output density. Steep curve: high contrast, punchy midtones, shadows drop fast, highlights clip fast. Gentle curve: more detail in the extremes, flatter midrange. Cinema stocks are almost universally designed with a gentle S-curve, so colorists have room to push the grade without the image falling apart.
But here’s what actually determines a stock’s look: the curve isn’t the same for every color channel.
A stock might have a steeper red curve than blue. That means warm tones render with more contrast than cool tones — which changes how skin reads, how sunsets behave, how shadows feel. This per-channel variation is where the personality lives. It’s not a bug. It’s the design.
Kodak Vision3 500T: The Stock That Everyone Uses, For Good Reason
Vision3 500T (5219) is the most shot cinema stock of the last twenty years. That’s not marketing copy — look at any laboratory report from any major production.
Why it dominates:
- Shadow lift: Pure black never develops to true density zero on 500T — there’s always a faint milkiness in the deepest shadows. This is the quality people describe when they say an image “feels like film.”
- Midtone warmth: The midtones carry a slight magenta-red push. On skin tones, this reads as warmth and dimension. On cooler scenes, it acts as a counterweight that keeps the image from going fully sterile.
- Highlight rolloff: The red channel compresses highlights more aggressively than the blue. So overexposed regions shift slightly cool — you’d expect them to go warm, but they don’t. This creates a specular quality that reads as naturally photographic rather than digitally blown.
When cinematographers call 500T forgiving, they mean its curves are gentle enough that a wide range of exposures produce workable negatives. Underexpose by a stop, overexpose by two, and you can still grade it into something usable. The color bias is subtle enough that you can push it in any direction without fighting the stock.
Kodak Vision3 250D: Same Family, Different Character
The 250D (5207) is optimized for daylight. It runs at lower sensitivity, which means smaller crystals — finer grain and marginally denser blacks.
The color bias is cooler than 500T. Less magenta, slightly more green in the shadows. In direct sunlight, 250D has a crispness that 500T can’t match. Not because it resolves more (both land around 100 lp/mm), but because finer grain lets detail read without interference.
If 500T is the versatile workhorse, 250D is the stock you reach for when you know exactly what you’re shooting and the light is on your side.
Fuji Eterna 500T: The Stock That Tells You the Truth
Fuji’s Eterna (8583) is the counterpoint to Kodak’s whole philosophy.
Where Kodak Vision3 is warm, Eterna is cool. Where 500T lifts its shadows gently, Eterna keeps its blacks dense and honest. Where Kodak flatters, Fuji records.
- Shadow response: Eterna’s blacks are deeper. Less shadow lift means more drama, but also less margin for error — underexpose it and you lose information that Kodak would have held.
- Color rendering: The green channel is slightly elevated in the midtones. Skin tones on Eterna read with a faint olive quality. Some cinematographers love this — it feels accurate, unmanipulated. Foliage and environmental greens, though, are exceptional — vivid and differentiated in a way that Kodak can’t quite match.
- Highlight behavior: Fuji clips more abruptly than Kodak. The rolloff is more linear, which gives overexposed regions a harder edge — more photographic, less cinematic in the Hollywood sense. If your aesthetic is controlled and precise, this is a feature. If your lighting is messier, it’s a liability.
Cinematographers who shoot Fuji tend to say it’s “more honest.” What they mean: it doesn’t have a built-in look that flatters your subjects and hides exposure mistakes. It shows you exactly what was there.
Kodak Portra 400: The Stock That Made Skin Tones a Selling Point
Portra is a still photography stock — not cinema — but its influence on contemporary film aesthetics is large enough that it belongs here.
Kodak specifically engineered Portra’s red and yellow channel response around the 590–620nm range that corresponds to human skin pigmentation. Subjects shot on Portra appear to have a slight luminosity against neutral backgrounds — not halation, not overexposure, just the way the stock maps that specific slice of the spectrum. It’s flattering in the most literal, technical sense: it renders skin differently from everything else in the frame.
Portra also has absurd highlight latitude for a 400-speed stock. Most stocks start compressing highlights at 2–3 stops over. Portra holds detail to nearly 5 stops over box speed. This is why it’s the default choice for wedding photographers, portrait photographers, anyone shooting in mixed light they can’t fully control.
How to Actually Choose
Stop thinking about which stock looks better in the abstract. They all look better or worse depending on what you’re asking them to do.
| Situation | Stock | Reason |
|---|---|---|
| Unpredictable lighting, need latitude | 500T or Portra 400 | Gentle curves absorb exposure mistakes |
| Controlled lighting, want precision | Eterna 500T | Won’t hide bad decisions — or good ones |
| Daylight, clarity over latitude | 250D | Lower ISO, finer grain, crispness |
| Gritty, urgent aesthetic | Push a high-speed stock (e.g. Tri-X 400 → 1600) | Aggressive grain, compressed contrast |
Stock selection stops being guesswork the moment you understand what each stock is actually doing to the light that hits it.
The warm lift in the shadows of Vision3 500T. The cool honesty of Eterna. The skin-specific response built into Portra. These aren’t vibes — they’re engineering decisions made by chemists who spent careers thinking about how silver crystals should behave. Understanding that doesn’t just help you pick a stock. It helps you understand what you’re actually looking at when you look at a photograph.
Ask any colorist what’s the hardest thing to replicate digitally.
Not skin tone. Not highlight rolloff. Not the characteristic curve of a specific emulsion.
Grain.
It always comes back to grain. And the reason is slightly embarrassing if you’re a digital engineer: the thing that makes film grain look right is that it’s genuinely, physically, irreducibly random — in a way that computers are terrible at generating.
Here’s why.
What’s Actually Inside a Roll of Film
Film emulsion is a suspension of silver halide crystals in gelatin. Billions of them, per frame. When a photon hits one of those crystals with enough energy, it triggers a chain reaction — silver ions get reduced to metallic silver, a latent image forms, development chemistry makes it permanent.
The part everyone skips over: crystal size is not uniform.
A single roll contains crystals that vary dramatically in size, shape, and sensitivity. This isn’t a manufacturing flaw. It’s deliberate. Larger crystals catch photons at lower light intensities but resolve less spatial detail. Smaller crystals are sharper but need more light to fire. A film stock is, among other things, a carefully calibrated distribution of crystal sizes — tuned for a specific balance of speed, grain character, and resolving power.
When you develop the film, the crystals that captured light get reduced to metallic silver grains. Their spatial distribution across the frame is determined by which crystals got hit — and photons arrive probabilistically, governed by quantum mechanics.
Real randomness. Not pseudorandom. Real.
Why Grain Looks Organic and Noise Looks Wrong
Film grain has three properties that digital noise almost never gets right.
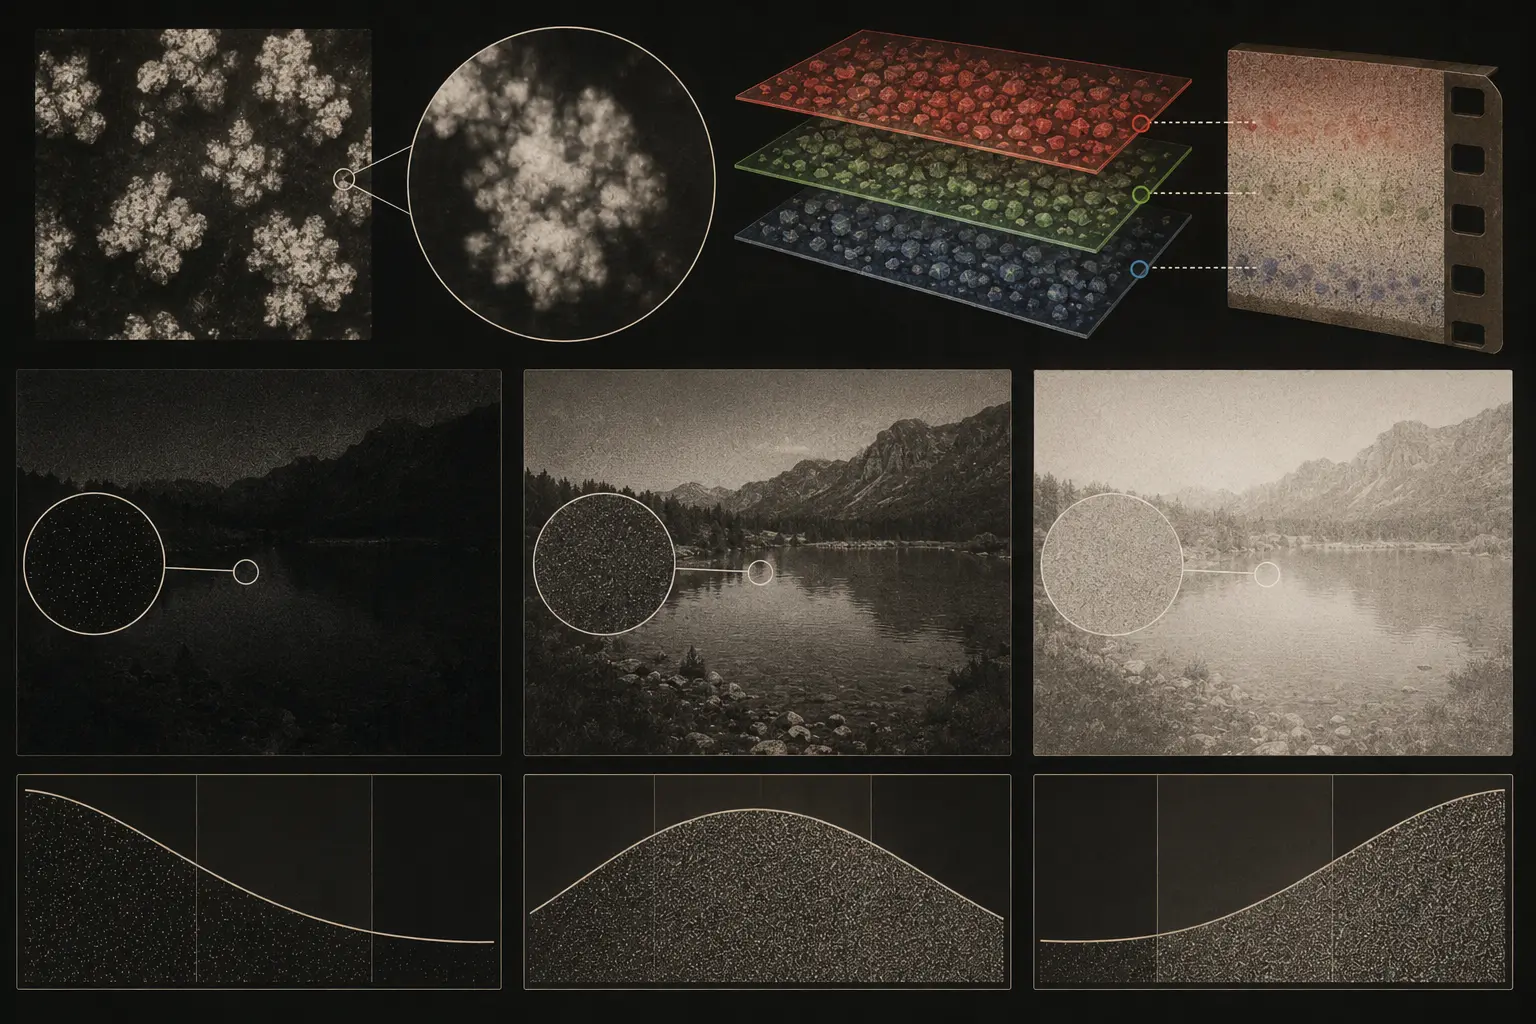
It clumps. Crystals in a gelatin suspension aren’t isolated — they’re in contact with their neighbors. Development chemistry spreads slightly beyond individual crystal boundaries. The resulting silver grains form clusters that are larger and more irregular than any single crystal. Visually: grain has spatial correlation. Adjacent grains relate to each other. It flows. It breathes. It doesn’t look like a pixel grid with random values applied on top.
It shimmers with color. Color film has three emulsion layers — sensitive to red, green, and blue — stacked physically on top of each other at different depths. Each develops independently with its own crystal distribution. The grain in the red layer is slightly different from the grain in the green layer, and both are misregistered with the blue layer because they’re at different physical depths. This is why color film grain has subtle, shifting color variation. Digital noise adds the same statistical pattern to every color channel simultaneously. It looks flat by comparison because it is flat.
It peaks in the midtones. This is the one that trips up almost every grain plugin ever made. Film grain is not worst in the shadows. In deep shadow areas, there aren’t enough exposed crystals to form visible clusters — the image is thin. In highlights, the emulsion is so thoroughly exposed that density becomes uniform. Grain is most visible in the midtones, where you have enough exposure to form clusters but not so much that everything blends together.
Digital noise does the opposite. It’s dominated by shot noise — worst in shadows, invisible in highlights. Shadow areas on a digital sensor look like static. Shadow areas on film look clean.
The Poisson Distribution Problem
Digital noise isn’t mysterious. It’s a direct consequence of how photons work.
Each photosite on a sensor counts the photons it receives during an exposure. Photon arrival is random — it follows a Poisson distribution. At ISO 800, a well-exposed photosite might collect 200 photons on average, with a variation of roughly ±14. That’s ±7%. Clean enough.
In deep shadow, that same photosite might collect 5 photons on average, with a variation of ±2.2. That’s ±44%. That’s the noise you’re seeing. It’s not the camera failing. It’s the fundamental statistics of light.
The result is spatially uncorrelated noise: each pixel is statistically independent of its neighbors. No clumping. No flow. No color variation between channels. Just random values at pixel scale, worst exactly where you don’t want them.
What It Actually Takes to Simulate Grain Correctly
The engineering problem in plain terms: you need randomness that has structure.
Not white noise (too uniform). Not Perlin noise (too smooth). Something in between — band-limited, spatially correlated, spectrally asymmetric, density-dependent, and temporally independent. Every frame should get a completely new grain field, because each frame of film is a physically separate exposure event. Crystals have no memory of the previous frame.
That last one is easy to overlook and almost always wrong in grain plugins. Static grain that doesn’t change between frames looks painted on. Film grain flickers — not randomly, it regenerates completely, because the crystals regenerate completely, because the film is new.
Getting this right means modeling the process, not the output. Not “what does grain look like” but “what physical process produces grain — and how do we replicate that process with math.”
The gap between a grain filter and real film grain isn’t a quality gap. It’s a category gap.
One is a texture applied to an image. The other is the direct visual record of quantum events happening in silver crystals in gelatin. The latter just looks different — not better in an aesthetic sense, but more coherent, in the way that things produced by consistent physical laws always cohere in ways that approximations don’t.
That coherence is what you’re actually chasing when you reach for the grain slider. Knowing that doesn’t make it easier to generate. But it does tell you what you’re actually trying to solve.
You’ve seen it a thousand times and never had a name for it.
That warm bleed of orange-red light pooling around a streetlamp in a 35mm photo. The glow seeping from a bright window in a film still. The thing that makes certain images feel lit from inside rather than just correctly exposed.
That’s halation. And it’s not an accident or a happy mistake — it’s physics. Direct, reproducible, and deeply weird once you understand what’s actually happening inside the film.
Light Doesn’t Stop Where You Think It Does
Here’s the thing nobody tells you about film: the emulsion is not opaque.
When light hits the top of a film frame, most of it gets absorbed by the silver halide crystals in the emulsion layer — the part that records the image. But some of it doesn’t stop there. It keeps going. Through the emulsion, through the transparent plastic or acetate base beneath it, all the way to the base-air interface at the bottom of the film — where it bounces back up.
That reflected light re-exposes the emulsion from below.
It comes back slightly displaced (it traveled further), slightly diffused (the base isn’t a perfect mirror), and — here’s the part that matters — slightly red-shifted. The shorter blue wavelengths scattered and died on the way through. By the time the reflected light reaches the emulsion again, red dominates.
That’s your glow. That’s your warmth. It’s not aesthetic — it’s spectral physics.
Why It Looks Different on Every Stock
The glow isn’t the same on every film. Of course it isn’t.
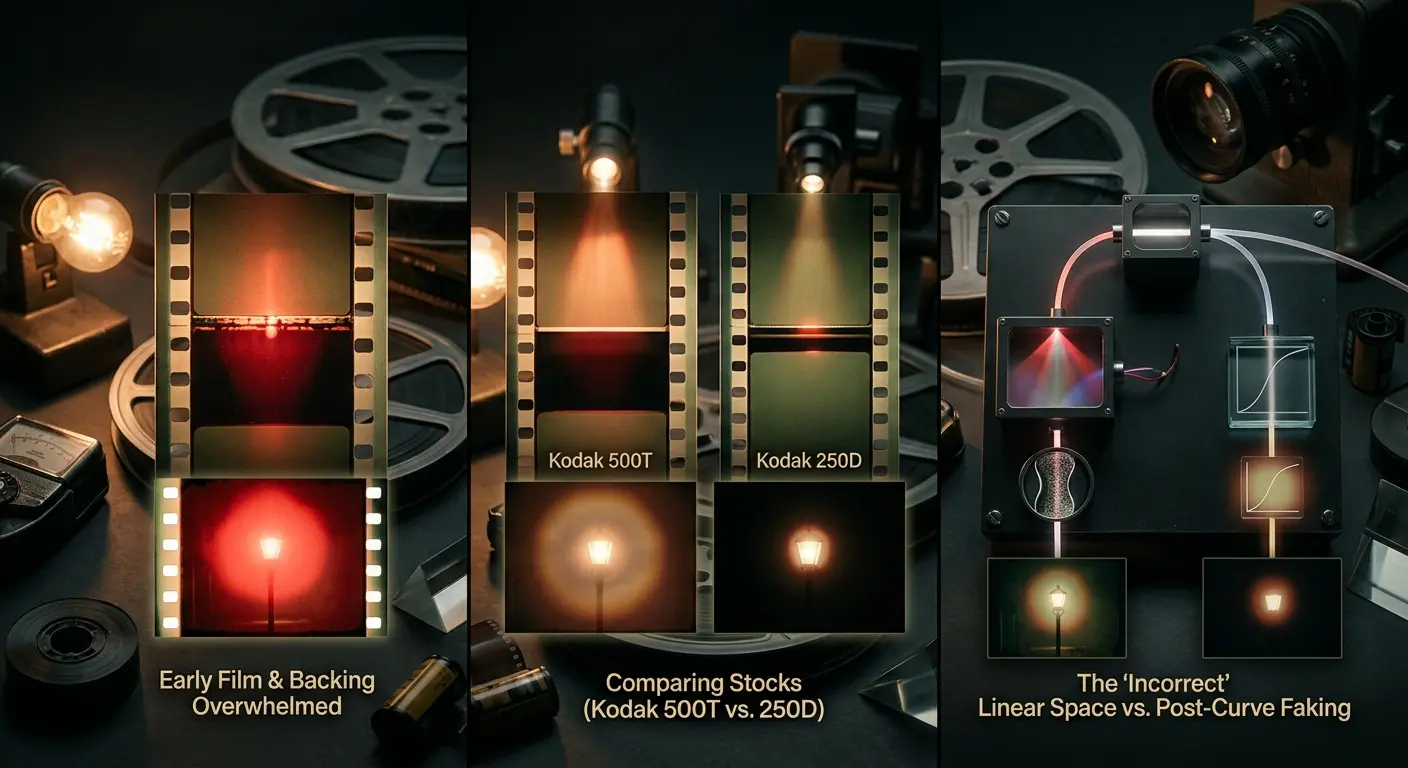
Different stocks have bases with different thicknesses and different refractive indices. Kodak Vision3 500T has a thicker base than the 250D — so light travels further before bouncing back, which means the halation on 500T spreads wider and lands softer. The 250D halation is tighter, crisper, less romantic.
This is why cinematographers who shoot on film have opinions about halation. Strong ones. The kind that come out at 11pm over a second drink.
The Part That Didn’t Work As Planned
Modern film stocks include an anti-halation backing — a dye layer designed to absorb that reflected light before it can bounce back and re-expose the emulsion. Kodak and Fuji engineers spent decades improving this layer.
It works. Mostly.
The problem is that it works by absorbing light, and dye layers can only absorb so much. Point a film camera at a genuine high-intensity source — a bare tungsten bulb, the sun through a window, a car headlight — and the backing gets overwhelmed. The halation breaks through anyway.
Early film had no backing at all. Images from the 1910s and 1920s show halation blooms so aggressive they read as artistic choices. Some of them were. Some cinematographers removed the backing intentionally to get more of it.
Why Faking It Is So Hard
Here’s where it gets interesting — and where most digital halation effects fall apart.
A halation filter applied in Photoshop or Premiere typically works like this: find the bright areas, add a glow, apply some red tint, call it done. It looks okay in a still frame. Push the grade and it falls apart.
The reason is order of operations.
Real halation happens before the light hits the tone curve. The glow is built into the raw exposure data, before any contrast or density is applied. It lives in linear light space.
When you apply a halation effect after a tone curve — which is how virtually every preset and plugin does it — you’re adding glow to values that have already been compressed, clipped, and remapped. The physics are inverted. You’re glowing on top of a ceiling the image already hit, rather than underneath it.
Cineon’s halation engine operates on linear light data before tone mapping. Luminance thresholds are set in exposure stops, not pixel values. The scatter is wavelength-dependent — the red channel gets a wider blur radius than the blue, which is how it actually behaves in a real film base. The result is composited back into the image at the correct opacity before any color processing happens.
It’s not a glow effect. It’s a physical simulation of what light does inside a piece of film.
Film’s “imperfections” aren’t random. They’re not aesthetic accidents that got retroactively aestheticized. They’re direct physical consequences of how light interacts with matter — consequences that follow laws, repeat consistently, and respond predictably to conditions.
That’s why they look right in ways that decorative digital effects never quite do. Physics is the best art director.
There’s a moment that happens to most CG artists or colorists when they first render in ACES.
They look at the image and think: “this is different.” Not louder. Not more saturated. Just — more like something you’d actually see with your eyes.
The highlights don’t blow out. The colors shift as they get brighter, the way real light behaves. The whole image has a quality that’s hard to name but immediately recognizable: it looks true.
That’s ACES. And it’s been behind the look of hundreds of major productions — The Lego Movie, Guardians of the Galaxy Vol. 2, Chef’s Table — for a reason.
What ACES actually is
Most people hear “ACES” and assume it’s a single color space, like sRGB or Rec. 709. It’s not.
ACES (Academy Color Encoding System) is an entire framework. It includes a collection of wide-gamut color spaces, transforms to move images between them, and a set of tools for viewing and grading that work consistently across any display. Built by the Academy of Motion Picture Arts and Sciences, it was designed to be the one standard flexible enough to handle everything from camera capture to archival storage to final output.
Inside ACES you’ll find:
- ACES2065-1 — the widest gamut, used for transfer and archiving between studios. You’ll almost never work directly in it.
- ACEScg — where CG artists live. Scene-referred, linear, massive dynamic range.
- ACEScc / ACEScct — for colorists. Non-linear, maps black at 0 and white at 1. ACEScct adds a toe in the darks so grading tools behave like they used to.
- ACESproxy — for camera playback and video monitoring.
The whole system runs on OpenColorIO (OCIO), an open-source color management framework from Sony Imageworks. When you see ACES in Nuke, Maya, or Houdini, OCIO is doing the work underneath.
Why sRGB isn’t enough
sRGB works. Most of the world is built on it. But it has a fundamental problem: its dynamic range is narrow.
When you render in sRGB, a pixel at full brightness is 1.0. That’s it. Lights that are brighter than that just clip — pure white, no detail, no rolloff. And as your colors get brighter, they drift toward yellow in ways that have nothing to do with how light actually behaves.
In the real world, your eyes handle massive variation in brightness. A lit room, a window in the background, a specular highlight on a glass — you can see detail in all of them simultaneously. Film handles this too. That’s why highlights on photographic film roll off gracefully instead of clipping hard.
ACEScg has an enormous dynamic range. White sits at around 16.0, not 1.0. That means there’s room for light to do what light actually does — get brighter gradually, shift color temperature as it intensifies, retain detail in ways that sRGB physically cannot.
The practical result: highlights retain detail. Colors desaturate as they brighten, the way a photographer would expect. You can use realistic light values without fighting clipping. The image looks like something that could have existed in front of a camera.
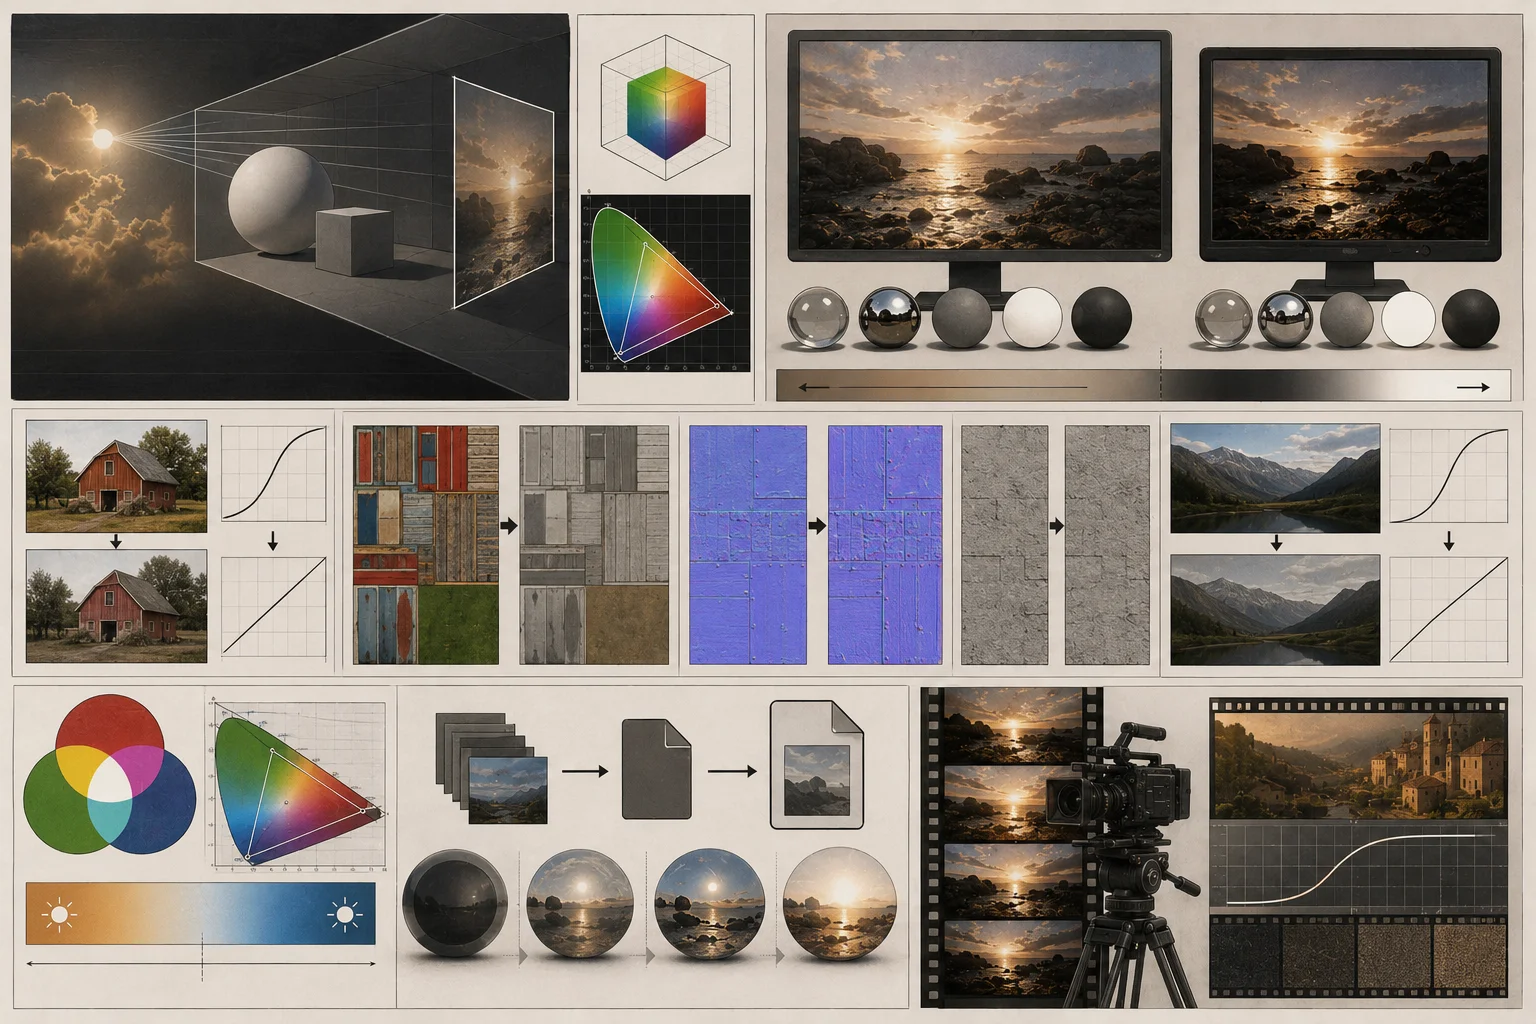
The mechanics worth understanding
Scene-referred vs. display-referred. ACEScg is scene-referred — it represents real-world light values linearly. sRGB is display-referred — it’s encoded to look correct on a specific screen. You’ll never view a raw ACES image directly. It always passes through the RRT (Reference Rendering Transform) and an ODT (Output Display Transform) before hitting your monitor. This is intentional. The pipeline separates “what the light was” from “what the display can show.”
Gamma. ACEScg is linear. Most images you’d use as textures — downloaded from the internet, made in Photoshop — aren’t. They carry a gamma curve that makes them look correct on sRGB monitors. Before using them in an ACES pipeline, that curve needs to come off. OCIO handles this with utility transforms so you’re not doing it manually.
White point. ACEScg has a D60 white point. sRGB has D65. They’re different. When you convert textures into ACEScg, a proper conversion handles both the gamma removal and the white point shift. The “Utility - sRGB - Texture” transform in OCIO does exactly this.
EXR. ACES images need to live in half-float 16-bit EXR format. Not JPEG, not PNG, not 8-bit anything. EXR can hold the high dynamic range values that ACES works with. If your image isn’t in EXR, it has to be converted before it enters an ACES pipeline.
Three texture scenarios that trip people up
Diffuse color textures. Use the “Utility - sRGB - Texture” transform. It linearizes, shifts the white point, and keeps pixel values mapped between 0 and 1, so your materials behave correctly.
Displacement, normal, and bump maps. Don’t convert these at all. The pixel values in a normal map aren’t colors — they’re vectors. Converting them would scramble them. Use “Utility - Raw,” which converts the format to EXR without touching the values.
Backplates. You want the image to look identical in your 3D viewport as it does in Photoshop. Use the “Output - sRGB” transform in inverse mode. It brings an sRGB image into ACEScg with a perceptually identical appearance — the weird trick that OCIO output transforms can run backward.
Cineon and ACES
If you’re using Cineon, you’re already in ACES territory.
ACES is built into Cineon’s color pipeline. When you apply a film emulation or work in the color grading tools, the underlying rendering is happening in ACEScg — which means you’re getting the highlight behavior, the natural color desaturation, and the extended dynamic range without having to set any of it up manually.
The film stocks in Cineon were designed to respond to ACES lighting. That’s why they look like film: the physics of how light interacts with tone curves, the way highlights compress, the characteristic grain structure — all of it assumes scene-referred linear input. When your footage or still is processed through Cineon, it’s going through the same pipeline that production facilities use for feature films.
This isn’t a checkbox. It’s the foundation of why the output looks the way it does.
The honest version of the learning curve
ACES takes some adjustment.
Pixel values above 1.0 take getting used to. Lights need to be thought of in real-world terms — which means more realistic values but also more care in setup. The first time you see your normal maps scrambled from a bad conversion, it’s confusing.
But the adjustment period is short. And what you get on the other side is renders that you don’t have to fight. Images where the light behaves like light, where skin tones hold up under brightness, where shadows have structure instead of collapsing to black.
It’s the closest a digital renderer gets to what a cinematographer sees when they shoot on film.
That’s the point.
Everyone wants the Portra 400 look. Almost nobody can tell you what it actually is.
Search the term and you’ll get a hundred presets promising it — sliders that warm the image up, crush the contrast a little, add some orange to the shadows, and call it a day. They get maybe 40% of the way there. The reason they fall short is that Portra’s look isn’t a color cast you can dial in. It’s a set of decisions Kodak’s chemists made about how three separate color channels should respond to light, and those decisions don’t map cleanly onto a “warmth” slider.
So before you reach for another preset, here’s what’s really going on.
What Portra 400 Actually Does to Color
Portra 400 is a high-speed color negative film with the finest grain in its class. That part you’ve heard. The part that matters more: Kodak engineered its red and yellow response around the 590–620nm band, which happens to be where human skin pigmentation lives.
That’s not a coincidence and it’s not marketing. It means skin gets rendered differently from everything else in the frame. A face shot on Portra sits in the image with a faint luminosity against a neutral background — not glow, not overexposure, just the stock mapping that slice of the spectrum with a gentler hand than it gives to, say, a green wall behind the subject. People read it as “flattering” without knowing why. The why is spectral.
The other half of the look is latitude. Most 400-speed films start compressing highlights two or three stops over box speed. Portra holds detail closer to five. That enormous headroom is why the highlights roll off so softly instead of clipping — and that soft rolloff is the single thing people most associate with “the film look,” even when they can’t name it.
Put those together and you get the signature: warm, clean skin; highlights that fade instead of breaking; shadows that stay open rather than going dense and muddy. Natural skin tones, high latitude, warm yellows, fine grain. That’s the whole personality, and it’s why wedding and portrait shooters defaulted to it for twenty years.
Why Presets Get It Wrong
A preset operates on the pixels you already have. It can shift hue, lift shadows, warm the midtones. What it can’t do is undo the contrast curve your camera or editor already baked in, then re-impose Portra’s gentler one in its place.
Portra’s highlight rolloff is a property of the film’s characteristic curve — the relationship between how much light hit the emulsion and how dense the negative got. To reproduce it honestly you have to work on that curve, not paint over the result. Most online “Portra filters” skip this entirely because it’s harder. They warm and fade and hope. The skin-specific response gets lost completely, because no single hue shift can treat the 590–620nm band differently from its neighbors without a real per-channel model underneath.
This is the gap between a film filter and a film emulation. One copies the symptom. The other models the cause.
Getting the Look on Your Own Photos
Cineon runs the actual emulation in your browser — the per-channel response, the highlight rolloff, the grain structure — on a GPU, no install, no plugin, no film budget. You load a photo, pick Portra 400, and see your image through that color science in real time.
A few things worth knowing if you want it to look right rather than just warm:
Expose a little brighter than you think. Portra was built for overexposure; the look lives in the upper midtones, and a flat or underexposed source has nothing for the rolloff to act on. If your photo is dark, lift it first.
Let the skin lead. The stock’s whole reason for existing is how it handles faces. Judge the result on a portrait, not a landscape — a sunset will look warm under almost anything, but only a real emulation makes skin sit the way Portra does.
Keep the grain honest. Portra 400 is fine-grained, not grainless. A trace of structure reads as film; a perfectly clean image reads as a filter trying to imitate film. Leave it on.
Best Uses
Portra 400 earns its reputation in exactly the situations it was designed for: portraits, fashion, travel, and anything shot in light you couldn’t fully control. The latitude is what saves you when the sun moves or the venue is half shade, half window. If you shoot people, this is the look that does the most work for the least fighting.
You’ve read this far, which means you’re not looking for another orange-shadows preset. You want the real thing — or as close to it as a screen can get.
So here’s the honest pitch: open a photo in Cineon, drop Portra 400 on it, and look at the skin. That’s the whole test. If it sits the way you’ve seen it sit on real film, you’ll know in about four seconds. If it doesn’t, you’ve lost nothing but four seconds.
Every effect is free to use and preview. You only pay when you want to export it clean. Go see what your photo looks like on Portra.
Fuji discontinued 400H in 2021 and the price of the remaining stock went insane almost overnight. That tells you something. People weren’t paying for film — they were paying for a specific feeling that nothing else quite reproduces.
That feeling is what every “Fuji 400H preset” is chasing. Most of them miss, and they miss in a predictable way.
What Fuji 400H Actually Does to Color
Where Kodak warms an image, Fuji cools it. That’s the whole philosophical split between the two brands, and 400H is the clearest example.
The stock pushes greens cooler and lifts highlights into a soft, almost pastel range. Skin doesn’t get the warm Kodak treatment — it sits a touch cooler, cleaner, with a luminous quality that reads as “airy” rather than “rich.” This is why it became the wedding film. A bride in a white dress under bright daylight is exactly the situation 400H was tuned for: it holds the highlight detail in the dress instead of blowing it out, and it keeps the whole frame light and open instead of contrasty.
The grain is fine. The contrast is gentle. The overall effect is an image that feels like it’s lit from inside, even in flat light.
Why Presets Get It Wrong
The pastel look comes from how 400H handles the top end of the exposure range, not from desaturating the image and adding a blue tint. Most presets do the second thing. You end up with something washed out and cold instead of soft and luminous — they look like a faded photo, not a Fuji photo.
The cool-green bias is also per-channel, not a global hue shift. 400H treats greens differently from skin and from sky. Drag a single temperature slider toward blue and you cool the skin along with everything else, which kills the exact thing that made the stock flattering. Reproducing it honestly means modeling each channel’s response separately, which is the part cheap filters skip.
A filter copies the tint. An emulation copies the chemistry that produced the tint.
Getting the Look on Your Own Photos
Cineon runs the 400H emulation in your browser on a GPU — the cool-green channel response, the soft highlight rolloff, the fine grain — with no install and no hunting for discontinued film on the secondhand market.
Shoot or pick a bright source. 400H lives in daylight and overexposure. A dark or moody photo has nothing for the pastel rolloff to work with; the look only appears in the upper midtones and highlights.
Watch the greens. The cool green shift is the giveaway that you’re looking at real 400H and not a generic “soft wedding” filter. If foliage and backgrounds cool down while skin stays clean, it’s working.
Keep highlights generous. The airy feeling is highlight detail held softly, not crushed contrast. Don’t darken the image to make it “moody” — that’s the opposite of what this stock is.
Best Uses
400H earns its reputation on weddings, fine art, soft portraits, and anything shot in open daylight. It’s the look for light, ethereal, highlight-forward images — not for drama or contrast. If your scene is bright and you want it to feel gentle, this is the stock.
You’ve read this far, so you already know the difference between a faded filter and the real pastel look. One you can spot in a second; the other you’ve been chasing.
Open a photo in Cineon, apply Fuji 400H, and check the highlights and the greens. If it feels lit from the inside, that’s the stock doing its job. Every effect is free to preview — you only pay to export clean. Go see if your photo gets that airy quality back.
Ask a hundred black-and-white shooters what they keep in the bag and most of them say HP5. Not because it’s the best at any one thing, but because it’s good at everything and forgives almost anything.
That versatility is the look people are actually after when they search for it, even if what they picture is just “nice black and white.”
What Ilford HP5 Plus Actually Does to Tone
HP5 has medium grain and a wide exposure latitude, which is the technical way of saying it handles bright daylight and deep shadow in the same frame without falling apart. The tonal rendering is the classic documentary signature: full range, honest midtones, shadows that hold detail rather than blocking up.
It also pushes well. Shoot it at 800 or 1600 and develop accordingly, and the grain gets more pronounced and the contrast climbs, which is how a lot of low-light reportage got its gritty look. At box speed it’s smooth and even; pushed, it gets expressive. The same film does both.
Converting a color photo to “black and white” is not the same as the HP5 look. HP5’s character is in how it maps color brightness to gray — the specific way reds, greens, and skin translate into tone — plus that medium grain structure. A flat desaturation throws all of that away.
Why Presets Get It Wrong
Most “black and white film” presets desaturate and add a noise layer. Desaturation collapses every color to its luminance with no regard for how a real film weighted the channels, so skin and sky and foliage end up at the wrong grays. HP5 has a specific spectral sensitivity that makes those translations look right.
The grain, again, is structure, not overlay. HP5’s medium grain lives in the tones; a uniform noise layer sits on top and reads as digital dirt the second you look at a smooth midtone.
A filter removes color. An emulation re-renders the tones the way the film’s chemistry would.
Getting the Look on Your Own Photos
Cineon runs the HP5 emulation in your browser on a GPU — the spectral tonal mapping, the medium grain, the wide latitude response — without a darkroom or a development tank.
Feed it contrast and texture. HP5 rewards scenes with a real tonal range: people, streets, architecture, anything with light and shadow to work across. Flat, evenly-lit subjects give it less to render.
Decide on grain by intent. Box-speed smoothness for a clean documentary feel, or lean into a grittier, pushed look for low-light energy. Both are HP5.
Trust the midtones. The honesty of the gray scale is the point. Don’t crush it into hard black-and-white contrast unless that’s the look you want — HP5’s strength is the full range.
Best Uses
HP5 Plus is the documentary, street, reportage, and low-light black-and-white film. It’s the all-rounder — the stock for when you want true film tonality and the freedom to push it when the light disappears.
You read to the end, so you already know desaturate-plus-noise isn’t the same as a real black-and-white film.
Load a photo with good light and shadow into Cineon, apply HP5 Plus, and look at where the grays land. Every effect is free to preview; you only pay to export clean. Go see your photo in honest black and white.
Kodak Gold is the film of memory. Not because it’s technically special, but because it’s the one most people’s childhood photos were shot on. Open any family album from the 90s and you’re looking at Gold — that warm, slightly golden cast that the brain now reads as “the past.”
That association is exactly why the look is so wanted, and exactly why a generic warm filter never feels right.
What Kodak Gold 200 Actually Does to Color
Gold runs warm, but specifically golden — yellows and warm midtones lifted in a way that makes sunlight feel a little richer than it really was. It’s a consumer film, so the contrast is friendly and the saturation is high enough to make a sunny day look cheerful without tipping into the hard punch of something like Vista.
The grain is consumer-grade, present but not aggressive. The overall character is forgiving and warm — a film designed to make ordinary snapshots look good in ordinary light, which is most of why it ended up defining a whole era’s worth of vacation photos.
The nostalgia isn’t a vibe you add. It’s the specific golden warmth in the midtones plus the gentle consumer contrast, together. Get both and the photo time-travels. Get only the warmth and it just looks orange.
Why Presets Get It Wrong
The usual mistake is dumping orange over the whole image and calling it nostalgic. Gold’s warmth is concentrated in the yellows and midtones, not a flat sepia wash across the shadows and highlights. Tint everything and you get a cheap “vintage” filter, not the specific golden glow.
The friendly contrast matters too. Gold isn’t high-contrast; part of its forgiving snapshot quality is a gentle curve that keeps shadows open. Presets that crank contrast to make it “pop” lose the easy, casual feeling that’s central to the look.
A filter washes the photo orange. The film lifted the gold and left the rest alone.
Getting the Look on Your Own Photos
Cineon runs the Gold 200 emulation in your browser on a GPU — the golden midtone warmth, the consumer contrast, the texture — with no roll to buy and no lab to wait on.
Shoot in sunlight if you can. Gold was built for sunny days, and that’s where the golden warmth has something to amplify. Overcast or indoor light gives it less to work with.
Keep it casual. This isn’t a precision stock. Don’t fight the warmth or the soft contrast trying to make it look “professional” — the charm is that it looks like a happy snapshot.
Let the grain sit. A trace of consumer texture is what makes it read as a real photo from the era rather than a digital warm filter.
Best Uses
Gold 200 is the family-and-travel film: sunny days, vacations, casual portraits, anything you want to feel warm and a little nostalgic. It’s not for drama or fine art. It’s for making good light feel like a good memory.
You’ve read the whole thing, so you already know a sepia wash isn’t the same as the golden glow you remember.
Open a sunny photo in Cineon, apply Kodak Gold 200, and look at how the light warms up without the shadows going muddy. Every effect is free to preview; you only pay to export clean. Go give your photo that album-page feeling.
Velvia 50 doesn’t record what was there. It records a more intense version of what was there, and that exaggeration is the entire reason landscape photographers built their careers on it.
It’s the opposite of a faithful film. It has opinions, loud ones, and for the right subject those opinions are spectacular.
What Fuji Velvia 50 Actually Does to Color
Velvia is hyper-saturated. Greens go deeper, reds go richer, blues get more intense — the whole frame turns up past reality. Combined with high contrast and deep, dense shadows, it produces images with enormous punch and almost no softness anywhere.
It’s also a slide (reversal) film at ISO 50, which means ultra-fine grain and very little exposure latitude. You expose Velvia precisely or you lose it — overexpose and the highlights are gone, underexpose and the shadows go black. That narrow latitude is the cost of the intensity.
The result is a look that’s almost too vivid for people but perfect for nature. A forest becomes saturated green, a sunset becomes molten, a red leaf becomes the loudest thing in the frame. It’s drama, manufactured at the emulsion level.
Why Presets Get It Wrong
Cranking saturation globally is the obvious wrong move, and it’s what most “vivid landscape” presets do. Velvia’s saturation isn’t uniform — it favors certain channels and certain ranges, which is why it intensifies a scene rather than just oversaturating it into a cartoon. A flat saturation boost clips the bright colors and muddies the rest.
The contrast and the deep shadows come from the steep reversal-film curve, not from yanking a contrast slider. Fake it after the fact and you crush detail instead of producing Velvia’s dense-but-intentional blacks.
A filter saturates everything. The film intensified the scene.
Getting the Look on Your Own Photos
Cineon runs the Velvia 50 emulation in your browser on a GPU — the per-channel saturation, the steep contrast curve, the ultra-fine grain — without the precision exposure anxiety of shooting actual slide film.
Use it on nature and color. Velvia wants landscapes, foliage, skies, anything with rich natural color to amplify. On skin it can look unnatural; this was never a portrait film.
Start from a well-exposed source. Velvia had no latitude, and the emulation looks best on a clean, properly-exposed photo. A blown-out or murky source has less for the intensity to build on.
Don’t expect softness. The look is punch and density. If you’re after gentle and airy, this is the wrong stock — that’s a feature, not a flaw.
Best Uses
Velvia 50 is the landscape, nature, architecture, and product film. It’s for subjects that benefit from intensity and saturation, where more vivid is more compelling. Keep it away from skin and lean into the drama.
You read all of it, so you know “more saturated” and “Velvia” aren’t the same thing. One clips into a cartoon; the other intensifies a scene without falling apart.
Drop Velvia 50 on a landscape in Cineon and watch the greens and skies turn up past what your eyes saw. Every effect is free to preview; you only pay to export clean. Go make a scene louder than reality.
CineStill 800T is the reason your feed is full of glowing neon signs and red-haloed streetlights. It’s motion picture film — Kodak’s tungsten cinema stock — repackaged for still cameras, and it brought a piece of the movie look to photography that nothing else quite had.
The thing everyone recognizes, even if they can’t name it, is the glow. That’s halation, and it’s the whole identity of this stock.
What CineStill 800T Actually Does
Real cinema film has a layer on the back that absorbs light and stops it from bouncing around inside the film. CineStill removes that layer in processing. So when a bright light hits the frame — a streetlamp, a neon sign, a car headlight — the light passes through, bounces off the back, and re-exposes the emulsion around it in a soft red halo. That red bloom around highlights is halation, and 800T is famous for it.
The stock is also tungsten-balanced, meaning it’s tuned for artificial light. Under streetlights and indoor bulbs it renders correctly instead of going orange the way daylight film would. At 800 speed it has cinematic grain that suits the dark scenes it was built for.
Put it together: a night street, neon glowing with soft red halos, the artificial light rendered cleanly, grain holding the whole thing in a filmic texture. It’s the closest a still photo gets to a frame from a movie.
Why Presets Get It Wrong
Halation is the hard part, and almost every “CineStill preset” gets it wrong or skips it. The red glow is light physically bleeding around bright areas — it follows the highlights, wraps them, varies with their intensity. A preset can’t do that with a color shift; some drop a flat red tint or a uniform glow that ignores where the actual highlights are. It looks like a sticker, not a bloom.
The tungsten balance is a per-channel response to artificial light, not a global temperature nudge. And the grain, as always, is structure rather than overlay. Three separate things, all of which a flat filter fakes badly.
A filter tints the image red. An emulation makes the light actually bleed.
Getting the Look on Your Own Photos
Cineon runs the 800T emulation in your browser on a GPU — the real halation bloom that tracks your highlights, the tungsten color response, the cinematic grain — so the glow lands where the lights are instead of smeared over everything.
Shoot lights at night. 800T’s entire reason to exist is bright points of light in dark scenes. Neon, streetlamps, headlights, windows — the halation needs something bright to bloom around.
Watch the halos. The red glow should hug the bright spots and fade out, not coat the frame. That’s the tell that you’re looking at real halation and not a red filter.
Keep it tungsten. The look depends on artificial light rendered correctly. A daylight scene won’t give you the 800T feeling no matter what you do to it.
Best Uses
CineStill 800T is the night, urban, and cinematic film: neon streets, city scenes after dark, portraits under artificial light. It’s the stock for turning a nighttime photo into something that looks pulled from a movie.
You read to the end, so you already know a red tint isn’t halation. One coats the photo; the other makes the lights bleed.
Load a night shot with some bright lights into Cineon, apply CineStill 800T, and watch the glow wrap the highlights. Every effect is free to preview; you only pay to export clean. Go make your city look like a film still.
If a black-and-white photo from the last seventy years stopped you in your tracks, there’s a real chance it was Tri-X. Capa, Frank, Winogrand, half the photojournalists who shaped how we picture the 20th century — they shot Tri-X, and the film’s character is welded to those images.
So when people want “the classic photojournalism look,” this is the film they’re describing, whether they know its name or not.
What Tri-X 400 Actually Does to Tone
Tri-X has coarse, expressive grain. Where Ilford’s HP5 is the smooth all-rounder, Tri-X is the one with attitude — its grain is visible, structured, and part of the emotional weight of the image. Paired with high contrast and strong shadow detail, it produces black-and-white that feels urgent and alive rather than clean and neutral.
It pushes famously well. A lot of the grittiest, highest-contrast reportage you’ve seen was Tri-X shot at 1600 and developed hard, where the grain explodes and the tones go punchy. At box speed it’s already characterful; pushed, it’s the definition of gritty.
The look is not “a photo with the color removed.” It’s that specific grain structure plus the contrasty tonal rendering plus the way Tri-X translates color brightness into gray. Strip the color off a digital file and you get none of that.
Why Presets Get It Wrong
Desaturating a color photo ignores how Tri-X actually mapped the spectrum to tone, so your grays land in the wrong places — skin, sky, and foliage all sit at brightnesses real Tri-X never would have given them.
And the grain is the heart of this stock. A uniform noise overlay is the opposite of Tri-X’s structured, expressive grain. Real grain clumps in the midtones and gives the image its texture; an overlay just lies on top like static. On Tri-X especially, faking the grain means losing the entire point.
A filter takes the color out. An emulation rebuilds the grain and tones the film created.
Getting the Look on Your Own Photos
Cineon runs the Tri-X emulation in your browser on a GPU — the coarse expressive grain, the high-contrast tonal curve, the spectral gray mapping — without a roll, a tank, or a darkroom.
Use it on scenes with tension. Tri-X is built for moments: street, people, action, anything documentary. Strong light and shadow give the contrast something to bite into.
Let the grain be loud. This is the stock where you don’t tame the texture. The grit is the feeling. A clean Tri-X is a contradiction.
Push it when the scene wants edge. Higher contrast and heavier grain read as urgent and raw, which is the classic reportage register. Pull it back for something calmer.
Best Uses
Tri-X 400 is the photojournalism, street, portrait, and low-light black-and-white film. It’s the stock for images that need to feel immediate and human — grain you can see, contrast you can feel.
You read the whole thing, so you’re not after desaturate-and-add-noise. You want the grain and contrast that documented a century.
Drop Tri-X 400 on a street or portrait shot in Cineon and let the grain do the talking. Every effect is free to preview; you only pay to export clean. Go shoot the 20th century’s black and white.
Portra 400 gets all the attention. Portra 800 is the one you actually want when the sun goes down.
It’s the same family, the same skin science, but built for the situations where 400 starts to struggle: dim rooms, evening streets, indoor events lit by whatever was already there. The trade-off is grain, and that trade-off is the whole reason people love it.
What Portra 800 Actually Does to Color
The skin response is pure Portra. Kodak kept the same warm, flattering treatment of the 590–620nm band that makes faces sit with that faint luminosity. So you don’t lose the thing that made the line famous just because you’re shooting in low light.
What changes is the grain and the color depth. At 800 speed the crystals are larger, so the grain is more present — but it’s organic, structured grain, not the flat mush of a pushed digital file. The color also runs a little richer and denser than 400, which gives night scenes a saturated, almost cinematic weight instead of looking thin and noisy.
This is the stock for warm skin in cold conditions. A face lit by a window at dusk, a portrait in a bar, a street at night — Portra 800 keeps the person warm and the scene rich while the grain quietly tells you it was dark.
Why Presets Get It Wrong
A preset can’t add real grain structure. It can drop a noise overlay on top, which sits on the image like dust instead of living inside the tones the way film grain does. The difference is obvious the moment you look at a shadow: film grain is denser in the midtones and structured; an overlay is uniform and dead.
The skin response is the same per-channel story as the rest of the Portra line — no single hue shift treats skin separately from the rest of the frame. Warm the whole image to fake it and you warm the shadows and the background into a muddy orange.
A filter adds noise on top. An emulation builds the grain into the tones.
Getting the Look on Your Own Photos
Cineon runs the Portra 800 emulation in your browser on a GPU — the warm skin response, the rich color depth, the organic high-ISO grain — without sourcing a fast film that costs a small fortune per roll.
Use it on low-light sources. This stock’s reason to exist is dim conditions. On a bright sunny photo you’re better off with Portra 400 — 800’s grain and density want darker scenes to work with.
Protect the skin. Judge the result on a face. If the person stays warm and dimensional while the background goes rich and a little grainy, you’ve got it.
Don’t over-clean the grain. The organic texture is the difference between “shot at night on film” and “shot at night on a phone and filtered.” Let it breathe.
Best Uses
Portra 800 is the low-light Portra: events, night street photography, indoor portraits, anything lit by ambient light you couldn’t control. It’s the stock for keeping people warm and flattering after dark.
You made it to the end, so you’re not looking for a noise overlay called a “film preset.” You want real grain and real Portra skin in low light.
Load a dim photo into Cineon, apply Portra 800, and look at the face against the grain. Every effect is free to preview; you only pay to export clean. Go see your night shots warm back up.
Agfa Vista 200 was never supposed to be cool. It was the film you grabbed at the drugstore checkout because it was cheap. Then Agfa stopped making it, the supply dried up, and suddenly the cheap drugstore film became the thing people hoard and write love letters to.
The look got popular precisely because it doesn’t behave like an expensive film. It’s loud.
What Agfa Vista 200 Actually Does to Color
Vista 200 pushes reds hard. Not warm-orange like Kodak — actual saturated red, the kind that makes a brick wall or a stop sign jump out of the frame. Paired with that is high contrast: deep shadows, punchy midtones, no gentle rolloff anywhere.
This combination is why it reads as “vintage” in a specific snapshot way. It’s not the soft, cinematic film look. It’s the look of a casual photo from twenty years ago that happened to nail the color — energetic, slightly overdriven, warm without being subtle about it.
The grain is consumer-grade, a little coarser than a pro stock, and that’s part of the charm. A perfectly clean Vista image looks wrong. The texture is the point.
Why Presets Get It Wrong
Most presets read “vibrant” and just crank global saturation. That blows out the whole frame evenly and looks like a phone filter, not like Vista. The stock’s character is specifically in the red channel — reds saturate harder than blues and greens, which is a per-channel behavior a saturation slider can’t reproduce without flattening everything else too.
The contrast is the other half people miss. Vista’s punch comes from a steep curve, not from sliding the contrast control up after the fact, which usually just clips your shadows into mud. Modeling the actual curve keeps the shadows deep but intact.
A filter pushes every color up at once. The film pushed red.
Getting the Look on Your Own Photos
Cineon runs the Vista 200 emulation in your browser on a GPU — the aggressive red response, the steep contrast curve, the consumer grain — without needing to find a roll that hasn’t existed in stores for years.
Find a scene with real color in it. Vista rewards reds and warm tones; a muted, gray scene gives it nothing to push. Street signs, painted walls, sunsets, anything bold.
Don’t fight the contrast. The hard shadows are the look. If you lift them back up to “fix” the image, you’ve turned Vista back into a flat digital photo.
Leave the grain on. Consumer texture is what sells the era. Clean it up and it stops reading as film.
Best Uses
Vista 200 is a street and casual film — daily life, vibrant landscapes, snapshots with energy. It’s not the stock for delicate skin tones or subtle work. It’s for when you want color that grabs and a frame that feels alive.
You read the whole thing, which means you’re not after another saturation-cranked filter. You want the actual red punch and the hard contrast that made a drugstore film worth hoarding.
Drop Agfa Vista 200 on a photo with some color in it and watch the reds come alive. Every effect is free to preview; you only pay to export clean. Go see your photo get loud.
The name Cineon has two meanings, separated by thirty years. One belongs to the history of cinema. The other is a browser app you can open right now.
Both are about the same problem. And understanding the first one is the only way to understand why the second one exists.
The Kodak film format
In the early 1990s, Kodak released a digital file format called Cineon. The .cin file used logarithmic encoding to scan motion-picture negatives — the kind running through a camera on a Hollywood set — and preserve their full tonal range in digital form.
Film negatives hold an enormous dynamic range. Highlights and shadows contain detail that standard digital formats simply discard. Kodak’s format was designed to keep all of it, encoding luminance on a log curve that matched the density response of photographic emulsion.
That log encoding became the conceptual foundation for the digital intermediate workflow — finishing a film in a computer before printing it back to celluloid. Its influence runs through every modern cinema color pipeline, including ACES.
Why log encoding still matters
Film looks different from digital for a specific reason. Not just grain or color — it’s how dynamic range is encoded.
A film negative captures light the way your eye does: high sensitivity in the shadows, a graceful roll-off in the highlights rather than a hard clip. Cineon’s log format was the first serious attempt to honor that in a digital file.
When cinematographers talk about shooting log today — S-Log, V-Log, C-Log — they’re using the same idea Kodak formalized in the early nineties. The format didn’t invent logarithmic thinking. It made it a standard.
The browser app
Cineon is also a browser app. The name is intentional: like the original format, it’s built on the idea that preserving the real character of film means modeling the physics that cause it — not approximating it, not filtering it.
The app physically simulates the three things that define how a film stock actually looks.
Grain. Not random noise. A spatially-clustered structure modeled from how silver halide crystals distribute in photographic emulsion. The algorithm follows the Newson Boolean model (IPOL 2017) — the statistical framework used in academic film-grain research. Fine-grain stocks like Kodak Ektar and coarse-grain stocks like Kodak T-MAX 3200 produce different patterns because the underlying particle distributions are different.
Color. Each film stock has a spectral sensitivity profile: a specific response to red, green, and blue light that no two emulsions share. Cineon models this using per-stock gamut matrices derived from the AMPAS Input Device Transform specifications — the same source professional color scientists use to calibrate film scanners.
Halation. The red glow around bright highlights in high-speed film. It comes from light passing through the emulsion, reflecting off the film base, and exposing the red-sensitive layer a second time. Cineon simulates this with a physically-based convolution kernel, not a bloom filter.
All of it runs in real time, in the browser, over WebGPU. No install, no plugin, no server round-trip.
What separates it from a preset
Most film simulation tools apply a LUT — a color lookup table — that maps a digital image toward the colors of a reference film scan. It can look convincing on the photos it was calibrated on and wrong everywhere else.
Cineon asks a different question. Not “what does this film stock look like” but “why does it look that way” — and models the answer. The grain structure, the color matrix, the halation kernel come from the physical properties of the emulsion, not a sample photograph.
That’s why the simulation holds across different lighting conditions, exposure levels, and subject matter. A shadow lit by tungsten and a highlight blown out by midday sun both behave the way they would on actual film. The same physics apply to both.
Go deeper
- Why Film Grain Looks Right and Digital Noise Never Does — the structural difference between grain and noise, and why it matters to the eye.
- What Is Halation? The Science Behind Film’s Signature Glow — where the glow comes from and how the physics work.
- ACES Color Space — What It Is and Why It Changes Everything — the modern descendant of Cineon’s log encoding.
Try it
Load a photo and switch between film stocks. The difference between Kodak Portra 400 and Fuji Provia 100F isn’t a hue shift — it’s a different way of responding to light. Once you see that, the name makes sense.
Kodachrome is the one people get sentimental about. It shot the National Geographic covers, the famous Afghan Girl, seventy years of the 20th century’s defining color images. Kodak killed it in 2009 and the last roll was developed in 2010, which means the look is now genuinely unrepeatable in its original form.
That finality is part of why it’s so chased. You can’t shoot it anymore. You can only reproduce it.
What Kodachrome 64 Actually Does to Color
Kodachrome was unusual even among films. Its color came from a dye-transfer development process that built the dyes into the emulsion during processing rather than carrying them in the film. The practical result was color that aged extremely well and a palette that’s hard to describe and impossible to mistake: rich, slightly dense reds, warm and accurate skin, and a controlled saturation that never tipped into the cartoonish.
At ISO 64 the grain is fine and the image is sharp. The contrast is present but not harsh. What you remember as “the Kodachrome look” is really that specific red rendering plus the warm skin plus the restrained, archival saturation — vivid without being loud, warm without being orange.
It’s a precise look, not a punchy one. That precision is exactly what makes it hard to fake.
Why Presets Get It Wrong
Kodachrome’s reds are the signature, and they’re a per-channel behavior — the red channel renders with a density and warmth the others don’t share. A global saturation or warmth adjustment can’t isolate that. You either get an oversaturated mess or a flat warm tint, and neither is Kodachrome.
The skin tones are the other tell. Kodachrome flattered faces in a controlled way, warm but accurate, never the orange overcorrection that cheap presets reach for. Reproducing it means modeling how the dye-transfer process mapped each channel, which is the work a filter doesn’t do.
A filter approximates a vibe. An emulation models the dye process that made the vibe.
Getting the Look on Your Own Photos
Cineon runs the Kodachrome 64 emulation in your browser on a GPU — the dense red response, the warm accurate skin, the restrained saturation, the fine grain — and it’s the closest you’ll get to a process that physically no longer exists.
Use it where color matters. Kodachrome rewards rich scenes: portraits, travel, street, anything with strong reds or skin to render. Its precision shows up on real subjects, not on flat ones.
Judge the reds and the skin together. If reds go rich and dense while faces stay warm but believable, you’re looking at the real thing. If the whole image just got more orange, it’s a filter.
Keep it restrained. The temptation is to push saturation for “impact.” Kodachrome’s power was control. Let it stay vivid-but-precise.
Best Uses
Kodachrome 64 is the portrait, travel, street, and vintage-aesthetic film. It’s for images where you want rich, archival color and warm skin without loudness — the classic editorial look that defined color photography for decades.
You read all of it, which means you care about more than a generic warm filter. You want the look you can’t shoot anymore.
Open a photo with strong color in Cineon, apply Kodachrome 64, and watch the reds and skin together. Every effect is free to preview; you only pay to export clean. Go see your photo in the film that color photography was built on.